
Photographing Waterfalls
Today, I will share my experience and explain my methodology and approach to photographing waterfalls and other moving bodies of water.
Francesco Berri
11/13/20246 min read
My Simple Process Explained
Introduction
Waterfalls are truly magical; they soothe the senses and make us feel as though time slows down. Despite their powerful rush, there’s something calming about watching water cascade downward. Every time I photograph a waterfall, I’m reminded of this peaceful energy.
Today, I want to share my approach to capturing the beauty and movement of waterfalls. The gear I used will be listed at the bottom
Process & Technique
Approaching the scene:
Photographing waterfalls can be done in many ways; there is no right or wrong approach, as long as you know what you want the image to look like and how to adjust the camera settings to achieve that.
As soon as I reach the spot, I don't take my camera out of the bag right away. I usually just pause and embrace the positive vibrations from the flowing water, the sound it makes, and the breeze it creates (this last one obviously depends on how big the waterfall is).
After taking in some of this positive energy and tuning myself with nature, I start observing what captures my attention without thinking too much over it; I look at the water flowing, check where the sun light comes from, and what is getting lit by it, if at all. I then start looking for ways to incorporate what I see into a pleasing composition.
Personally, I always try to find some interesting foreground, this could be anything from a rock formation to a plant, leaves, or checking if the water flowing creates interesting shapes or if there is some white foam swirling around.
I generally take my phone out of my pocket and use its camera to find a rough composition. Smartphones nowadays are amazing tools for landscape photography, they are light and quick to grab, and they are very useful tools to frame the scene and check if something might look nice in different compositions. With no need to get the camera out of the bag and tripod set-up, this is a nice way to move around freely and explore different scenes within the same area.
Once I find the angle and direction from where to shoot, I set up the tripod, get the camera out, and start finalizing my composition.
My preferred settings:
When shooting moving water, I rarely want it to look still; to show its motion in a photograph and to make it an essential part of the photo (making the image come to life), a longer shutter speed is necessary. I commonly use 1/4 sec to 1/2 sec as necessary, the longer the shutter stays open, the more movement is captured in the image. Be careful though, that very long shutter speed may result in the water looking silky smooth, taking away all details from it. Though this can be pleasing, my personal preference is to avoid dragging the shytter too much in these sittings.
For these types of photographs, I always start by setting my camera up as below:
ISO100, the lower the better
Shutter at 1/4sec or 1/2sec, depending by how much movement i want the water
Aperture set to what's most convenient given the scene and the lens I use. I try not to use a small aperture, and to get everything in focus from very close to infinity, I use the hyperfocal distance table from PhotoPills.
The link provided has a comprehensive list of cameras, if you don't find yours, make sure to download their app, it's one of the most useful tools I use for most of my images. with the benefit that it is free to use.
The gear I use:
TRIPOD
The enemy of any photo is sudden movements and/or vibrations due to wind gusts. To get a sharp image using a low shutter, regardless of the lens you are using, it is essential to use a fairly sturdy tripod. Make sure that you set it up on stable ground, if you are on soft wood or moss, add some spikes to it if you can, this way you can penetrate that soft soil layer and reach the more solid substrate below it.
I use a Manfrotto 290 Dual with some custom-made feet, which can hold 2.5 inches long metal spikes.
LENS
My lens of preference for intimate scenes is a wide angle, which I can use if I want to incorporate something very close to me in the foreground and create a much deeper-looking scene. I also use a mid-range lens for bigger falls, I find that standing further away on bigger falls helps enhance their look and feel.
FILTERS
Other very important pieces of gear are a polarizer and ND filters:
A polarizing filter is used to get rid of all distracting reflections and reveal details over wet rocks and vegetation. It also enhances colors making them look more saturated.
An ND filter is used to darken the scene, just like wearing some sunglasses, but for your lens!
These are used when the scene is a bit too bright and you have some blown-out areas in the frame after dialling in your preferred settings.
The best advice I can give is to either close your aperture (which might diminish the sharpness of your final photo) or to use an ND filter. This will simply take some stops of light away from the scene without altering anything else.
My preferred ND filters are:
ND 8 - 3 stops
ND 16 - 4 stops
ND 32 - 5 stops
ND 1000 (1024) - 10 stops
These can all be stacked with each other to darken the scene as needed.
I know many of you will ask:
“Hey, wouldn’t it be better to use a variable ND filter instead of bringing so much glass in the bag?”
To which I say: Yes, this would be ideal if you’re looking for convenience. On the other hand, I don't particularly like a variable ND, I find it creates distracting lines on the final photo, which, in my opinion, take away from the quality and sharpness of the image.
REMOTE SHUTTER RELEASE
Okay, this is not essential, but having a remote shutter release option can be very helpful.
The purpose is to help minimize camera shake caused by pressing the shutter button, physically touching the camera can introduce unwanted vibrations, resulting in a blurry image.
There are many way to achieve this:
Self-timer - many cameras nowadays have this function, this method allows to set a delay before the shutter releases. It can be setup to delay the shutter release by 2sec or 10sec.
Intervallometer - this is a device that connects to the camera via cable, it automates the shutter release process, allowing to capture a series of images at predetermined time intervals. It can also be used to trigger the camera shutter once.
Wireless shutter release - just like an intervallometer, this can trigger your camera shutter remotely, with the additional benefit of not having to use a cable to do so.
Your own camera app - i.e. Canon Camera Connect, this app allows you to connect to your camera via Bluetooth, essentially transforming your smartphone into a remote control, just like using a wireless shutter release, with the benefit that it is free to use.
Advices
Familiarize yourself with your camera before heading out!
As the weather is often unpredictable, with shifting clouds that affect light, it’s good practice not to get discouraged, some clouds might actually help reduce harsh highlights and blown-out spots in the scene. You need to be prepared to adjust your aperture or ISO as needed to get the correct exposure.
Don't feel stuck where you set up!
Small shifts in camera angle and position could aid in removing harsh highlights and enhancing your composition.
Pro Tip
Always carry a lens cloth.
Mist and splashes can fog up your lens quickly, making photos less sharp.
Conclusions
Photographing waterfalls is both thrilling and relaxing. It reminds me why I love taking photos: being outside, feeling the anticipation of the perfect moment, the technical challenge, and seeing my vision come to life in the shot. Patience and attention to detail can make all the difference.
What about you? How do you approach photographing moving waters like waterfalls, rapids, or the sea?
Feel free to share your tips or stories in the comments section.
Photos I Took

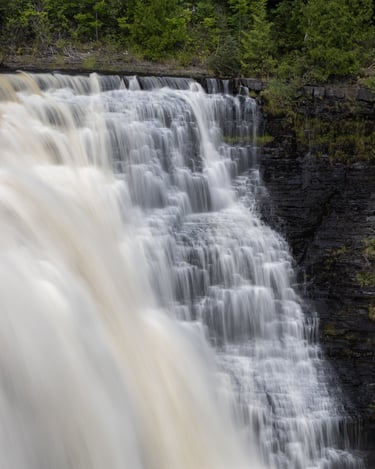


1/4sec f/8 ISO100
ND32 + CPL
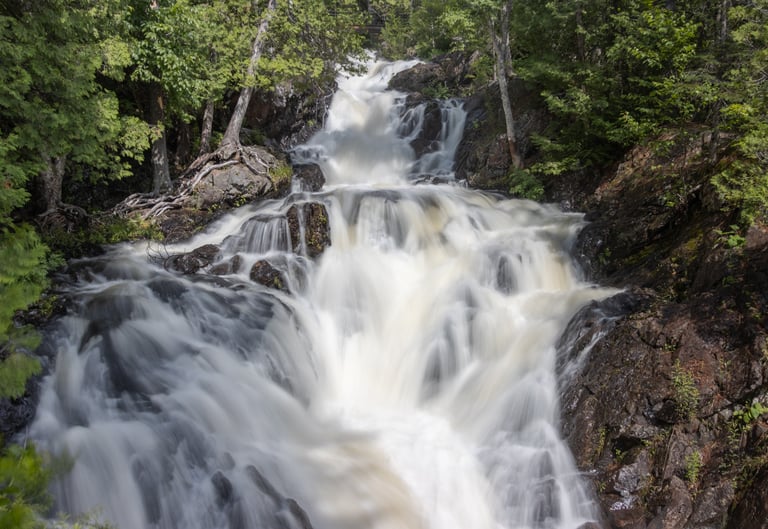
1/2sec f/3.5 ISO100
ND32 + CPL
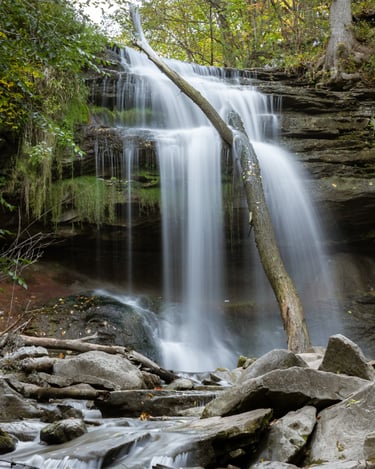
2.5sec f/9 ISO100
ND16 + CPL